Click with the left mouse button on DIALux Wizards in the WELCOME window in order to use this wizard.
Fig. 317 DIALux wizards – Quick street-planning wizard
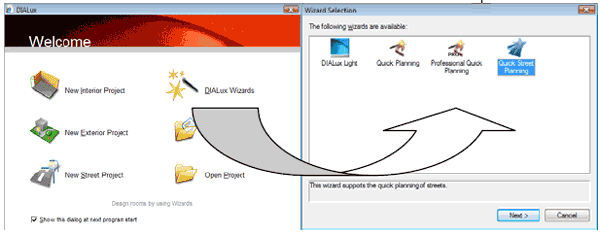
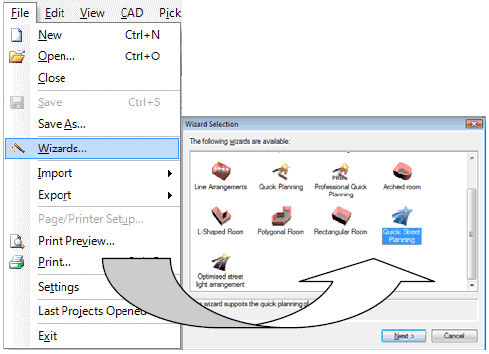
If you do not see the WELCOME dialogue any more, you will find the wizards in the menu File → Wizard.
Fig. 318 Wizards via Menu
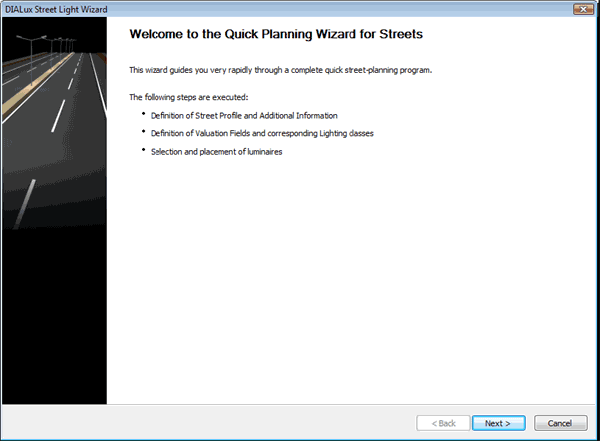
This wizard guides you through the quick planning for streets.
Fig. 319 Startup dialogue for street light wizard
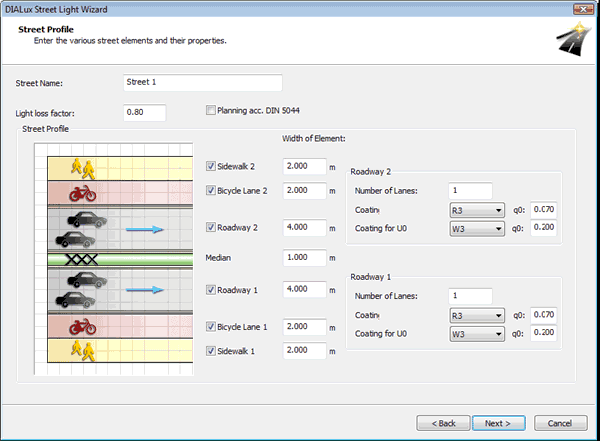
Here you can specify the single elements for the street and their properties. Confirm each of your steps by clicking on Next.
Fig. 320 Street profile
Select those roadway elements which belong to the street profile of the project. The coating can be chosen for dry and wet surrounding conditions. This is necessary only for the calculation of the same uniformity "U0 wet". Street name and maintenance factor are likewise inserted on this page.
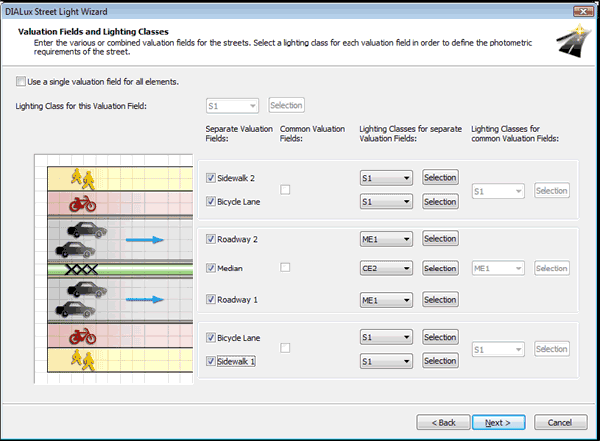
In the following window you can fix the individual or combined valuation fields for the street. In order to define photometric requirements for the street, select an illumination class for every valuation field. This is one of the essential innovations of the EN13201.
Fig. 321 Valuation Fields and Illumination Classes
By using the Selection button the illumination class wizard can be started. To understand this see also the section Illumination class Wizard.
You can also select single valuation fields and illumination classes for each element.
Fig. 322 Valuation Fields and Illumination Classes
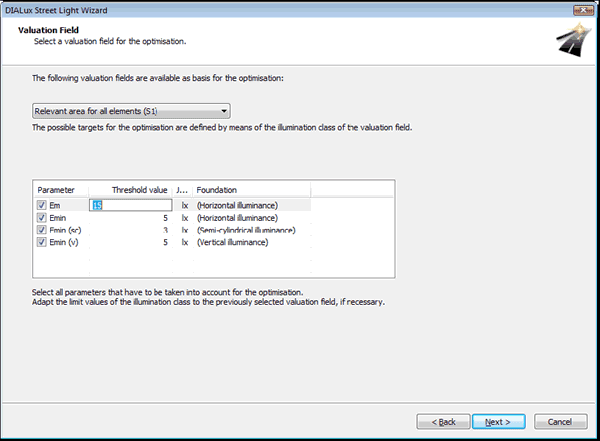
In the window Valuation field you can select a valuation field for the optimisation, i.e. you define the photometrical data as basis for the optimisation. You can change the respective limit values via left-click on the numbers.
Fig. 323 Limit values for the optimisation
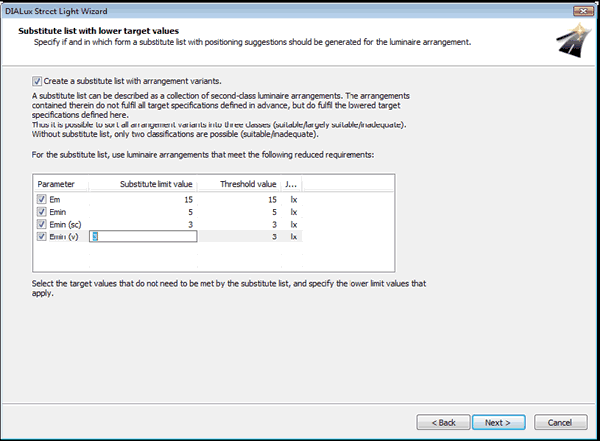
DIALux provides you with the street arrangement adapted to the parameters selected. However, under circumstances according to selected parameters or used luminaires no arrangement which fulfils all limit values can be found. On the window Substitute list you can specify the lower limit values. Thus it is possible to sort all arrangement variants into three classes (suitable, largely suitable and inadequate). Without a substitute list only suitable and inadequate arrangements are possible.
Fig. 324 Substitute list
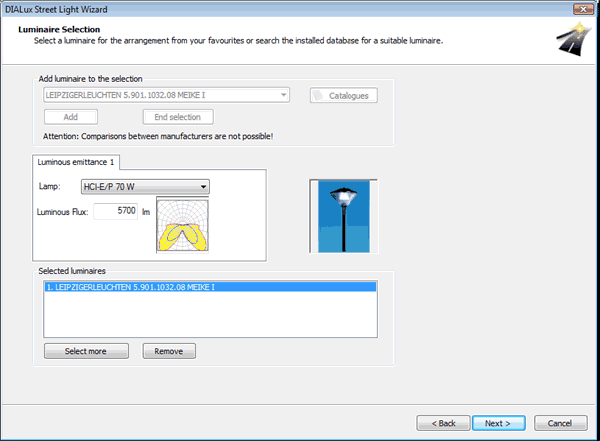
The next window allows you to choose a luminaire. You can select several luminaires from a manufacturer and compare them with each other. Click on “Select more” to get in the selection mode. Attention: In general comparisons between manufacturers are not possible.
Select the luminaires from your list of the recently used luminaires or choose new products from the catalogues installed. Via the button “Add” the current luminaire will be taken into the list of the “Selected luminaires”. Click the button “End selection” if you have selected all luminaires which you will take into consideration for the optimisation. In the list of the “Selected luminaires” you can choose every product and have a look at the technical properties or remove it again from the list.
Fig. 325 Luminaire selection
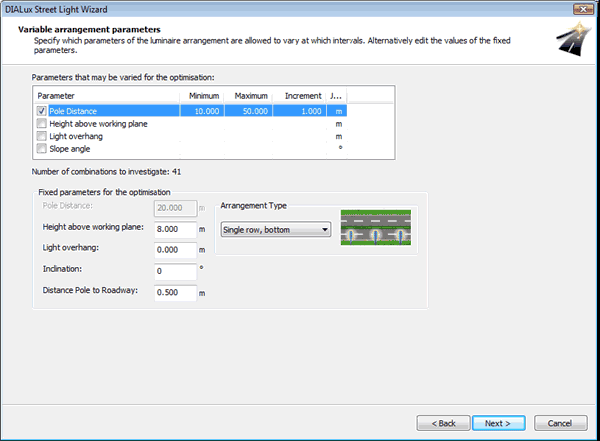
At last you can specify the parameters for the arrangement to be optimised, like pole distance, height above working plane or light overhang. For not variable parameters you can edit the values of the fixed parameters – also the arrangement type. If you leave this window by clicking on “Next” the calculation of the optimal arrangement will be started automatically.
Fig. 326 Variable arrangement parameters
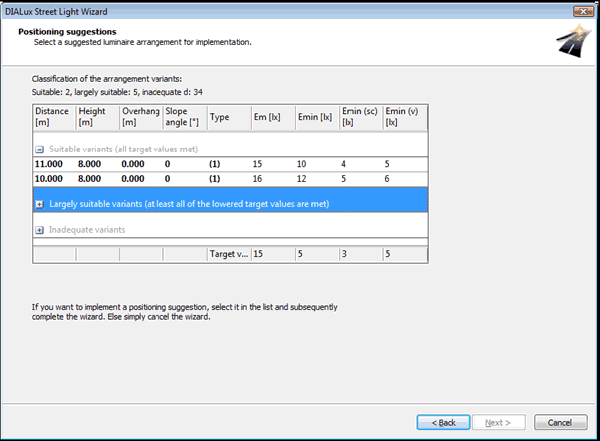
After the calculation DIALux offers you possible positioning suggestions. The suggestions are divided into suitable, largely suitable (provided that you have activated the substitute list) and inadequate arrangements. You can open or close these three groups individually via a click on +/-sign in the list. The results can be sorted depending on the several parameters up and down, while you click on the suitable column header in the result list. DIALux shows you in the footer the values of the parameter required. In order to implement a suggestion simply select it while clicking on it.
Fig. 327 Positioning suggestions
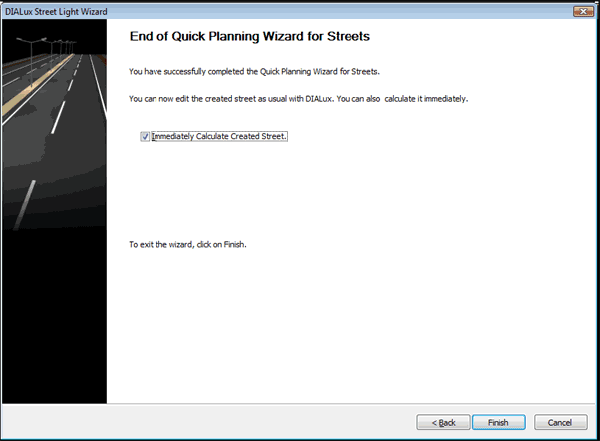
Afterwards a final dialogue will appear automatically. If you activate the checkbox, the generated street will be calculated immediately.
Fig. 328 Final dialogue
Click on the Finish button and your street project will be displayed. You can do further work on this later.
New features and increments
Changes in existing functionality
Installation
Installation after Internet Download
Installation from CD
Online Menu
Online Update
Manage Newsletter subscription
Wishes and Feedback / Send problem report
Install Luminaire Data
About PlugIns
About Online Catalogues
Lamp PlugIns
DIALux directories
Background information
Furniture, textures, my database
Projects and raytracing files
Program files, support
Common used program files (DIALux, PlugIns)
DIALux Light
Working with Wizards
The DIALux User Interface
The CAD Window
The Project manager
The Luminaire Selection
The User Database
Insert Luminaire Files into DIALux
Lamp PlugIns
The Furniture Tree
The Colours Tree (since version 4.3, formerly Texture Tree)
The Output Tree
The Guide
The Inspector
Edit Mode
Optimise Personal Settings
General Options
Direct3D as an alternative to OpenGL
Create a New Project
Open a new project
Project information in the file open dialog
Edit Rooms
Edit Room Geometry
Edit Room Data
An easy method for determining maintenance factor
Extended method for determining maintenance factor
Modify Properties of Individual Walls
Insert Room Elements
Modify a Room with Room Elements
Vault and half vault
Insert via Property Page
Insert Furniture
Insert Furniture
Insert via Property Page
Create Furniture
Import Furniture Files
Extrusion Volumes
Subtraction of Objects
Selecting Single Surfaces
Windows and Doors
Decoration Objects
Insert Decoration Objects
Calculate with Decoration Objects
Insert Textures
Insert via Drag & Drop
Edit Placed Textures
Delete Textures
Import Textures into the Texture Tree
Edit Room Geometry with DWG or DXF-File
Duplicate (Copy Rooms/Scenes/Streets)
Duplicate an Existing Room
Insert and Edit Luminaires and Luminaire Arrangements
Online Catalogues
Individual Luminaires
Aligning Luminaires
Inserting Luminaire Fields
Inserting Luminaire Lines
Aligning Lights
Inserting Luminaire Circles
Separating Luminaire Arrangements
Modify the position of a Luminaire
Luminaires with articulated joints
Unrestricted lighting arrangements
Aligning luminaire arrangements
Calculation of luminaire geometry included
Illumination strategies
Insertion of luminaries with „direct planar lighting”
Insertion of luminaries with „vertical planar lighting”
Coloured light
Background information
Lamp spectrum / Light colours
Colour filters
Coaction of spectral distribution of the light source and colour filter
Light colours in the ray tracing
White balance
Light Scenes and Control Groups
Definition
Requirements
Generate a project with light scenes and control groups
Modify light scenes and control groups
Export of light scenes
Emergency lighting
Global
Escape route lighting
Open area lighting (anti panic)
High risk task area lighting
Luminaires with emergency lights
Emergency lighting data sheet
Daylight calculation in DIALux
Basics
Sky types in DIALux
Light Scenes
Daylight calculation
Obstruction
Sun and shadow visualisation
Settings in the calculation dialogue
Working in the 3D View
Setup the 3D View
Check Calculation Values in the 3D View
Save 3D View
Presentation of false colour rendering
Working in Various Views
Save 3D CAD views
Wireframe Model
Editing Inserted Objects
Moving Objects
Using any surface as a working surface
Moving and Rotating Objects without Pick Grid
Scale or rotate
Rotating Objects
Scaling Objects
Combining and Saving Objects
Moving the Coordinate Origin of an Object
Resetting the rotation of the origin
Editing Object Surfaces
Arrangement aids
Measurement of distances
Working with the snap grid
Automatic help lines
Helping areas defined in the ruler
Working with help lines
Simple help lines
Poly help lines
Spline help line
Circular help line
Help grids
Copy and paste with CTRL+C, CTRL+V and CTRL+H
Copy Along a Line
Align and distribute
Centre objects in the room
Calculation Surfaces and other Calculation Objects
Calculation Surfaces
Calculation surfaces for different types of illuminance
Penetration
Task Areas
Calculation Points
UGR Calculation
Insert UGR Calculation Point and UGR Calculation Area
Adjust Viewing Direction of UGR Observer and UGR Area
Exterior Lighting
Exterior Scenes
Ground Elements
Floodlight Illumination
Lighting Design according to prEN12464 Part 2 / EN8995-2
Glare Rating
Obtrusive Light / ULR Calculation
Obtrusive Light / Luminous Intensity Calculation Point
Street Valuation Fields in Exterior Scenes
Road lighting
Standard Streets
Quick Street Planning Wizard
Wizard Optimised Street Light Arrangement
Street Planning without Wizard
Illumination Conditions Wizard
Illumination Class Wizard
Street Illumination
Luminance Calculation according to DIN 5044
Global Output Settings
User Data and Project Data
Global Settings
Output
Viewing Calculation Results
Limit Result Output
Output Settings
New Output in DIALux
Luminaire Data Sheet
Luminance Diagram
Tabular Presentation of Photometric Data of Luminaires
Tabular Presentation of Exterior Scenes
Creating User-Defined Standard Output
Save Output as PDF-File
Export Output Graphics, tables, text and graphic
DWG and DXF Import and Export
DWG / DXF-Import
Basic DWG / DXF Settings and Layer Selection
Edit a Room based on the DWG / DXF-Ground Plan
Working with the DWG / DXF Background in the 3D View
DWG / DXF-Export
Energy Performance of Buildings
Background information
Why energy evaluation in DIALux?
Structure of an energy evaluation project
Energy evaluation rooms with links to DIALux rooms and without
Working on parameters
Calculation and results
Documentation of energy evaluation results
Making videos in DIALux
Raytracer
Background
POV-Ray Settings within DIALux
Photo Realistic Images with Raytracing
Basic Settings
Quick preferences
Image preferences
Indirect calculation
Brightness preferences
Raytracing-Options for Surfaces
3-D Standard View for Raytracing
Starting POV-Ray
Start of the adapted POV-Ray Version
Smoothing edges
Picture ratio
Camera
Animation
Animation with Keyframes
Translation animation
Colour
Further functions of POV-Ray
Appendix A Keyboard Short Cuts