A standard street can contain several street arrangements of luminaires but no other luminaire arrangements or furniture. The valuation field is defined with the first street arrangement.
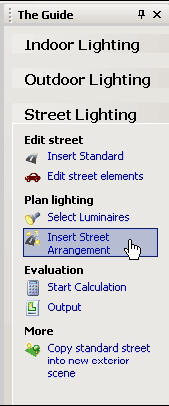
To insert the street arrangement you can use The Guide
Fig. 360 Insert street arrangement via “The Guide”
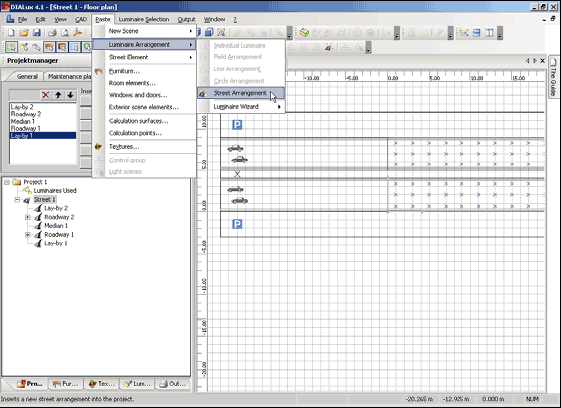
or the menu Insert → Luminaire Arrangement → Street Arrangement when you have selected the street in the Project manager
Fig. 361 Insert street arrangement via menu
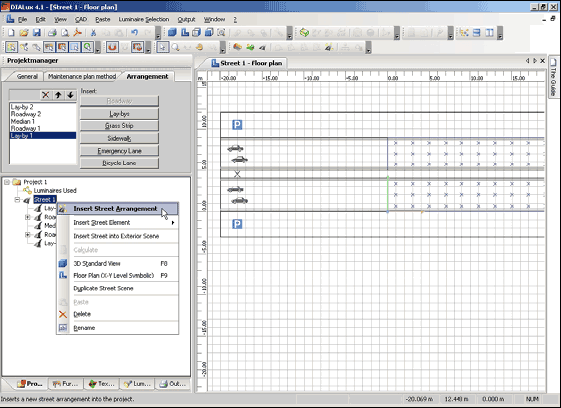
or by means of right mouse button, after you have picked the street in the Project manager.
Fig. 362 Insert street arrangement via right mouse button
DIALux offers all the key parameters for positioning street luminaires.
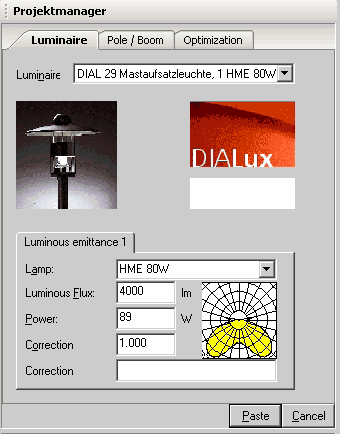
To position luminaires first you select the type of luminaire in the manufacturers PlugIn. Now you use the option Insert Street Arrangement and choose the product from the luminaire list.
Fig. 363 Insert Street Arrangement – Luminaire
The Property Page Luminaire allows you a choice of luminaires, as well as the entry of technical data for the luminous emittance.
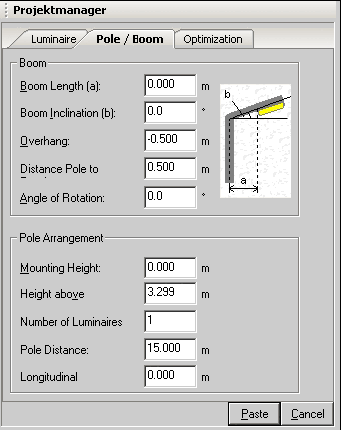
Fig. 364 Insert Street Arrangement – Boom properties and pole arrangement
In the Property Page Pole / Boom you can define specific properties of the boom as well as the pole arrangement.
The drawing in Fig. 364 illustrates the Boom Length and Boom Inclination. The Overhang defines how far the middle of the luminaire plane (centre of gravity of the luminaire) overlaps the roadway. The Distance Pole to Roadway is measured between the root point of the pole and the border of the roadway. Additionally you can specify the Pole Arrangement here.
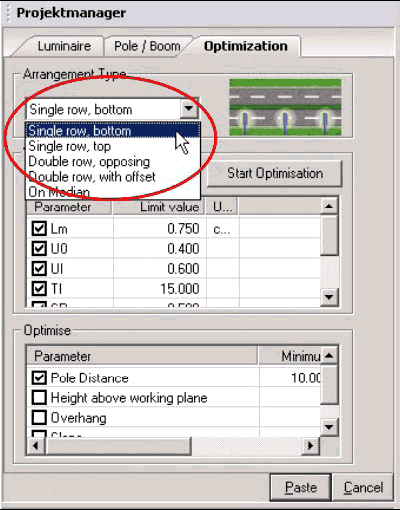
A good way to get the optimal distance between the luminaires is to use the Property Page Optimisation. Under Arrangement Type you can define the place along the street where you want to install the luminaires. A list of arrangement types is available to you.
Fig. 365 Insert Street Arrangement – Select the arrangement type
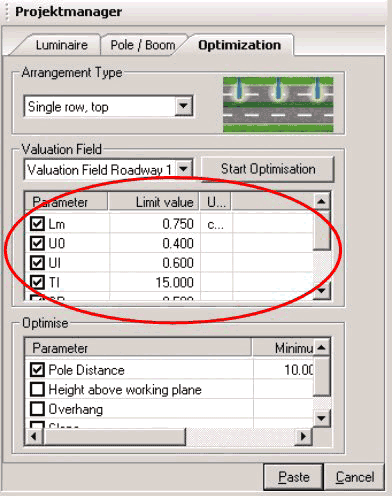
In the valuation field you can specify the photometric values of the roadway (illumination class and condition). In this Property Page the minimum values to be reached for the illumination class are already entered. If you wanted to optimise on other values, enter here the desired limit values. You activate the optimisation via the Start Optimisation button. Be aware that if you optimise many parameters at the same time, the calculation time can take several minutes.
Fig. 366 Insert Street Arrangement – Optimisation / Valuation Field
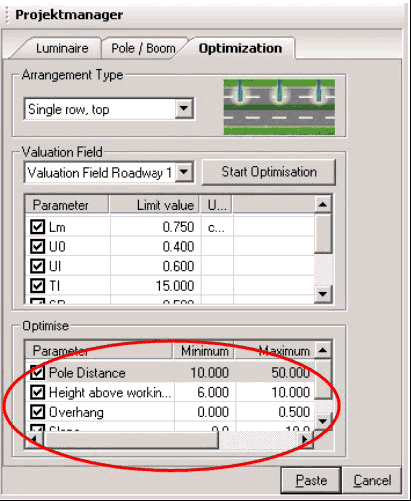
Then DIALux calculates according to the choice and weighting of the parameters, the optimal pole distance, the height above working plane, the overhang and the slope. The checkbox provides for the activation or deactivation of the parameters to be optimised. The purpose of the optimization is to find the maximum pole distance, the minimum height above the work plane, the minimum overhang and/or the minimum inclination slope.
The optimisation is carried out before the arrangement is placed; however it can be accomplished after the insertion.
Fig. 367 Insert Street Arrangement – Optimise
Alternatively you can enter the values numerically, in order to fix the minimum, maximum or the step width of the respective parameters. To insert the luminaire arrangement in your street project, please, click on the Paste button.
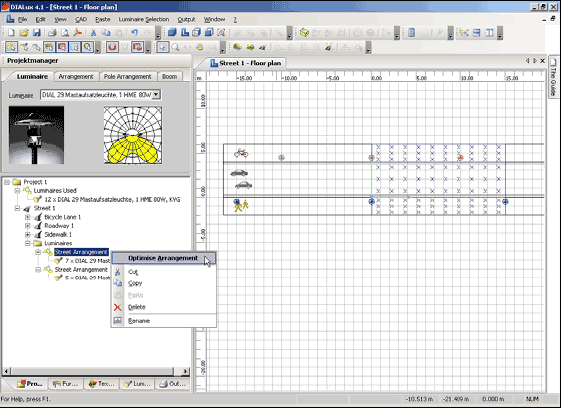
In the context menu of the street arrangement you can optimise individually the arrangement of your luminaires. To do this select with the right mouse button the street arrangement in the Project manager.
Fig. 368 Street arrangement – Optimise arrangement
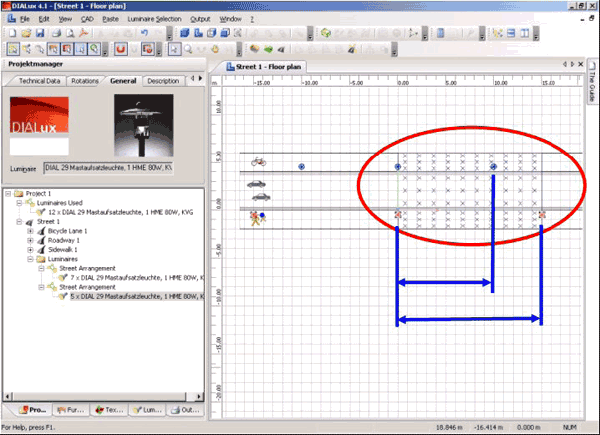
The luminaire arrangement always defines the valuation field. If you insert several luminaire arrangements, the resulting valuation field depends on each case of the maximum (pole) distance between two luminaires, shown in the following example (see Fig. 369). The luminaires of the lower arrangement therefore specify the calculation field.
Fig. 369 Calculation field in the ground plan view
The starting point of the arrangement, relatively to the calculation field can be changed under Pole Arrangement → Longitudinal.
The Inspector provides technical data on the inserted luminaire arrangement (see chapter Luminaire Arrangement).
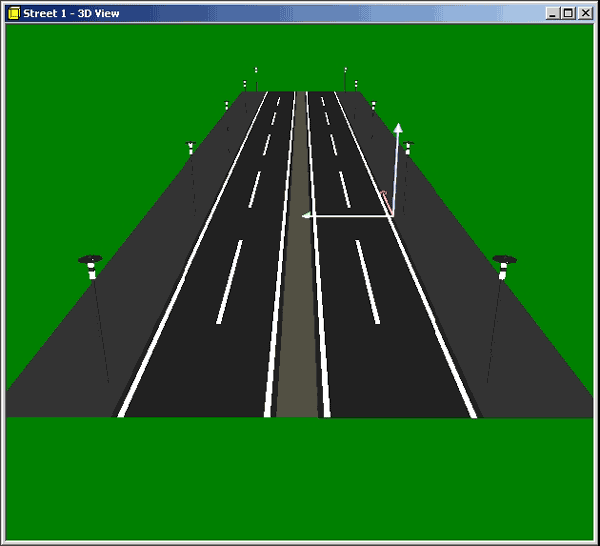
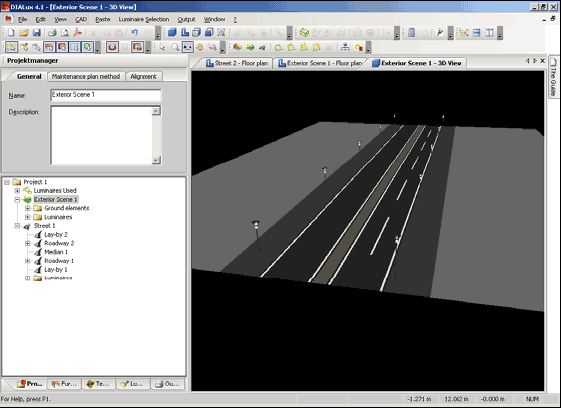
DIALux displays the street in 2D and in 3D view just like rooms and exterior scenes.
Fig. 370 3D visualisation of the street
You can rotate, zoom and roam the 3D view and export it as *.jpg like all other scenes.
NOTE: The rendering shows the distribution of the illuminance but not the luminance.
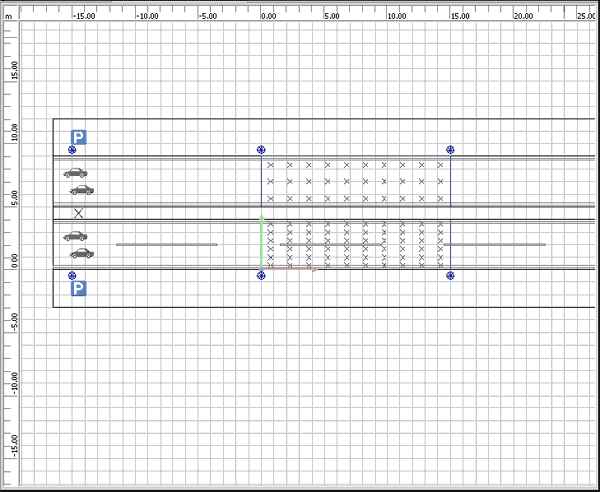
Fig. 371 2D visualisation of the street
In the floor plan view DIALux also shows the valuation field / calculation grid together with the street elements and luminaires.
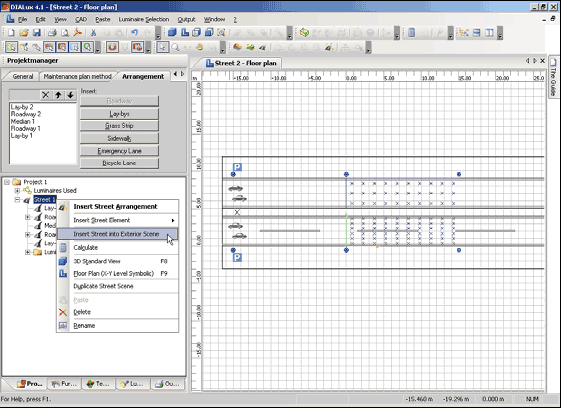
DIALux offers the option to insert streets into exterior scenes.
Fig. 372 Insert street into exterior scene
You can work on the individual street elements and luminaire arrangements in the same way as you did in your street project. All street elements are shown in the exterior scene as ground elements.
Fig. 373 Street in an exterior scene
New features and increments
Changes in existing functionality
Installation
Installation after Internet Download
Installation from CD
Online Menu
Online Update
Manage Newsletter subscription
Wishes and Feedback / Send problem report
Install Luminaire Data
About PlugIns
About Online Catalogues
Lamp PlugIns
DIALux directories
Background information
Furniture, textures, my database
Projects and raytracing files
Program files, support
Common used program files (DIALux, PlugIns)
DIALux Light
Working with Wizards
The DIALux User Interface
The CAD Window
The Project manager
The Luminaire Selection
The User Database
Insert Luminaire Files into DIALux
Lamp PlugIns
The Furniture Tree
The Colours Tree (since version 4.3, formerly Texture Tree)
The Output Tree
The Guide
The Inspector
Edit Mode
Optimise Personal Settings
General Options
Direct3D as an alternative to OpenGL
Create a New Project
Open a new project
Project information in the file open dialog
Edit Rooms
Edit Room Geometry
Edit Room Data
An easy method for determining maintenance factor
Extended method for determining maintenance factor
Modify Properties of Individual Walls
Insert Room Elements
Modify a Room with Room Elements
Vault and half vault
Insert via Property Page
Insert Furniture
Insert Furniture
Insert via Property Page
Create Furniture
Import Furniture Files
Extrusion Volumes
Subtraction of Objects
Selecting Single Surfaces
Windows and Doors
Decoration Objects
Insert Decoration Objects
Calculate with Decoration Objects
Insert Textures
Insert via Drag & Drop
Edit Placed Textures
Delete Textures
Import Textures into the Texture Tree
Edit Room Geometry with DWG or DXF-File
Duplicate (Copy Rooms/Scenes/Streets)
Duplicate an Existing Room
Insert and Edit Luminaires and Luminaire Arrangements
Online Catalogues
Individual Luminaires
Aligning Luminaires
Inserting Luminaire Fields
Inserting Luminaire Lines
Aligning Lights
Inserting Luminaire Circles
Separating Luminaire Arrangements
Modify the position of a Luminaire
Luminaires with articulated joints
Unrestricted lighting arrangements
Aligning luminaire arrangements
Calculation of luminaire geometry included
Illumination strategies
Insertion of luminaries with „direct planar lighting”
Insertion of luminaries with „vertical planar lighting”
Coloured light
Background information
Lamp spectrum / Light colours
Colour filters
Coaction of spectral distribution of the light source and colour filter
Light colours in the ray tracing
White balance
Light Scenes and Control Groups
Definition
Requirements
Generate a project with light scenes and control groups
Modify light scenes and control groups
Export of light scenes
Emergency lighting
Global
Escape route lighting
Open area lighting (anti panic)
High risk task area lighting
Luminaires with emergency lights
Emergency lighting data sheet
Daylight calculation in DIALux
Basics
Sky types in DIALux
Light Scenes
Daylight calculation
Obstruction
Sun and shadow visualisation
Settings in the calculation dialogue
Working in the 3D View
Setup the 3D View
Check Calculation Values in the 3D View
Save 3D View
Presentation of false colour rendering
Working in Various Views
Save 3D CAD views
Wireframe Model
Editing Inserted Objects
Moving Objects
Using any surface as a working surface
Moving and Rotating Objects without Pick Grid
Scale or rotate
Rotating Objects
Scaling Objects
Combining and Saving Objects
Moving the Coordinate Origin of an Object
Resetting the rotation of the origin
Editing Object Surfaces
Arrangement aids
Measurement of distances
Working with the snap grid
Automatic help lines
Helping areas defined in the ruler
Working with help lines
Simple help lines
Poly help lines
Spline help line
Circular help line
Help grids
Copy and paste with CTRL+C, CTRL+V and CTRL+H
Copy Along a Line
Align and distribute
Centre objects in the room
Calculation Surfaces and other Calculation Objects
Calculation Surfaces
Calculation surfaces for different types of illuminance
Penetration
Task Areas
Calculation Points
UGR Calculation
Insert UGR Calculation Point and UGR Calculation Area
Adjust Viewing Direction of UGR Observer and UGR Area
Exterior Lighting
Exterior Scenes
Ground Elements
Floodlight Illumination
Lighting Design according to prEN12464 Part 2 / EN8995-2
Glare Rating
Obtrusive Light / ULR Calculation
Obtrusive Light / Luminous Intensity Calculation Point
Street Valuation Fields in Exterior Scenes
Road lighting
Standard Streets
Quick Street Planning Wizard
Wizard Optimised Street Light Arrangement
Street Planning without Wizard
Illumination Conditions Wizard
Illumination Class Wizard
Street Illumination
Luminance Calculation according to DIN 5044
Global Output Settings
User Data and Project Data
Global Settings
Output
Viewing Calculation Results
Limit Result Output
Output Settings
New Output in DIALux
Luminaire Data Sheet
Luminance Diagram
Tabular Presentation of Photometric Data of Luminaires
Tabular Presentation of Exterior Scenes
Creating User-Defined Standard Output
Save Output as PDF-File
Export Output Graphics, tables, text and graphic
DWG and DXF Import and Export
DWG / DXF-Import
Basic DWG / DXF Settings and Layer Selection
Edit a Room based on the DWG / DXF-Ground Plan
Working with the DWG / DXF Background in the 3D View
DWG / DXF-Export
Energy Performance of Buildings
Background information
Why energy evaluation in DIALux?
Structure of an energy evaluation project
Energy evaluation rooms with links to DIALux rooms and without
Working on parameters
Calculation and results
Documentation of energy evaluation results
Making videos in DIALux
Raytracer
Background
POV-Ray Settings within DIALux
Photo Realistic Images with Raytracing
Basic Settings
Quick preferences
Image preferences
Indirect calculation
Brightness preferences
Raytracing-Options for Surfaces
3-D Standard View for Raytracing
Starting POV-Ray
Start of the adapted POV-Ray Version
Smoothing edges
Picture ratio
Camera
Animation
Animation with Keyframes
Translation animation
Colour
Further functions of POV-Ray
Appendix A Keyboard Short Cuts