For each assessment zone you can (have to) adjust a lot of parameters, influencing the energy demands of that assessment zone. There are partly different parameters for the EN 15193 and the DIN 18599.
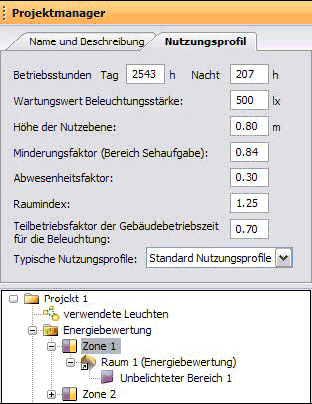
When using the DIN 18599, there are some parameters taken from the so called utilization profile of the super ordinate utilization zone. That can’t be done in EN 15193, since there is no such profile.
Fig. 426 Utilisation profile of an utilisation zone in a planning according to DIN 18599
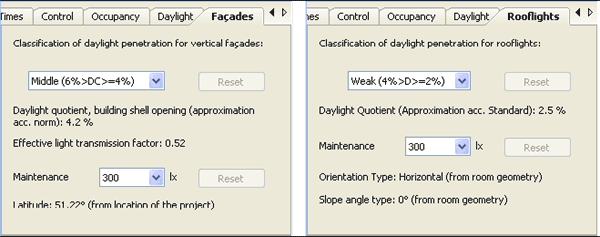
Furthermore, there are some parameters only for daylight supplied assessment zones.
Fig. 427 One property page of a daylight supplied assessment zone
Some only for special daylight sources.
Fig. 428 Property pages for assessment zones, that are daylight supplied by windows respectively roof lights
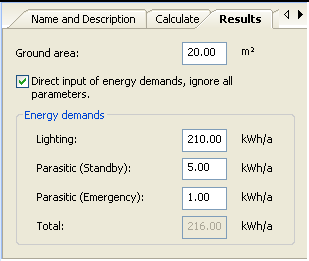
Assessment zones of unlinked energy evaluation rooms have additional parameters, since direct input of energy consumption is possible.
Fig. 429 Direct input of energy consumption values in unlinked energy evaluation rooms
Most parameters can be edited in the common manner, others can only be read and some others can be edited normally and are resettable to an internally calculated value in addition.
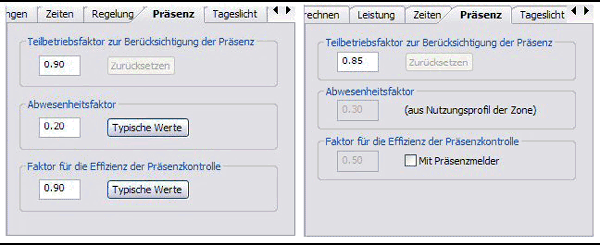
Fig. 430 Occupancy parameters of an assessment zone in EN 15193 (left) and in DIN 18599 (right)
Within a EN planning the parameters “Absence Factor” and “Factor for Occupancy Control” can both be edited in the common way. Both have even a supporting functionality to set them to typical values. The parameter “Occupancy Dependency Factor” results from these two parameters by expressions and formulars from the EN 15193. One can easily understand that by changing one of the first two parameters and watch the changes of the third one. There is exactly one calculated value of the third parameter that results from the other ones. Nevertheless, the third parameter can be edited in the common way. There may be special circumstances or information, that define this parameter differently. So when you edit such a parameter, this will be stated in the output. The documentation will include not only the edited value, used for the energy evaluation, but also the initially calculated value, resulting from the other parameters. In such cases, you are well advised, to state why you changed the calculated value in the description of the assessment zone. If you want to return to the calculated value, you can easily reset it by pressing the “Reset” button.
Within a DIN planning the “Absence Factor” is only readable, because it belongs to an utilization profile. The “Factor for Occupancy Control” is only readable as well, because it is only changed by the selection of “With Occupancy Sensor” yes or no. For the “Occupancy Dependency Factor” the same holds as with EN 15193.
There are a lot of relations and dependencies between parameters. They all have one thing in common: the duty of documentation, to explain and circumstantiate calculated energy demands.
New features and increments
Changes in existing functionality
Installation
Installation after Internet Download
Installation from CD
Online Menu
Online Update
Manage Newsletter subscription
Wishes and Feedback / Send problem report
Install Luminaire Data
About PlugIns
About Online Catalogues
Lamp PlugIns
DIALux directories
Background information
Furniture, textures, my database
Projects and raytracing files
Program files, support
Common used program files (DIALux, PlugIns)
DIALux Light
Working with Wizards
The DIALux User Interface
The CAD Window
The Project manager
The Luminaire Selection
The User Database
Insert Luminaire Files into DIALux
Lamp PlugIns
The Furniture Tree
The Colours Tree (since version 4.3, formerly Texture Tree)
The Output Tree
The Guide
The Inspector
Edit Mode
Optimise Personal Settings
General Options
Direct3D as an alternative to OpenGL
Create a New Project
Open a new project
Project information in the file open dialog
Edit Rooms
Edit Room Geometry
Edit Room Data
An easy method for determining maintenance factor
Extended method for determining maintenance factor
Modify Properties of Individual Walls
Insert Room Elements
Modify a Room with Room Elements
Vault and half vault
Insert via Property Page
Insert Furniture
Insert Furniture
Insert via Property Page
Create Furniture
Import Furniture Files
Extrusion Volumes
Subtraction of Objects
Selecting Single Surfaces
Windows and Doors
Decoration Objects
Insert Decoration Objects
Calculate with Decoration Objects
Insert Textures
Insert via Drag & Drop
Edit Placed Textures
Delete Textures
Import Textures into the Texture Tree
Edit Room Geometry with DWG or DXF-File
Duplicate (Copy Rooms/Scenes/Streets)
Duplicate an Existing Room
Insert and Edit Luminaires and Luminaire Arrangements
Online Catalogues
Individual Luminaires
Aligning Luminaires
Inserting Luminaire Fields
Inserting Luminaire Lines
Aligning Lights
Inserting Luminaire Circles
Separating Luminaire Arrangements
Modify the position of a Luminaire
Luminaires with articulated joints
Unrestricted lighting arrangements
Aligning luminaire arrangements
Calculation of luminaire geometry included
Illumination strategies
Insertion of luminaries with „direct planar lighting”
Insertion of luminaries with „vertical planar lighting”
Coloured light
Background information
Lamp spectrum / Light colours
Colour filters
Coaction of spectral distribution of the light source and colour filter
Light colours in the ray tracing
White balance
Light Scenes and Control Groups
Definition
Requirements
Generate a project with light scenes and control groups
Modify light scenes and control groups
Export of light scenes
Emergency lighting
Global
Escape route lighting
Open area lighting (anti panic)
High risk task area lighting
Luminaires with emergency lights
Emergency lighting data sheet
Daylight calculation in DIALux
Basics
Sky types in DIALux
Light Scenes
Daylight calculation
Obstruction
Sun and shadow visualisation
Settings in the calculation dialogue
Working in the 3D View
Setup the 3D View
Check Calculation Values in the 3D View
Save 3D View
Presentation of false colour rendering
Working in Various Views
Save 3D CAD views
Wireframe Model
Editing Inserted Objects
Moving Objects
Using any surface as a working surface
Moving and Rotating Objects without Pick Grid
Scale or rotate
Rotating Objects
Scaling Objects
Combining and Saving Objects
Moving the Coordinate Origin of an Object
Resetting the rotation of the origin
Editing Object Surfaces
Arrangement aids
Measurement of distances
Working with the snap grid
Automatic help lines
Helping areas defined in the ruler
Working with help lines
Simple help lines
Poly help lines
Spline help line
Circular help line
Help grids
Copy and paste with CTRL+C, CTRL+V and CTRL+H
Copy Along a Line
Align and distribute
Centre objects in the room
Calculation Surfaces and other Calculation Objects
Calculation Surfaces
Calculation surfaces for different types of illuminance
Penetration
Task Areas
Calculation Points
UGR Calculation
Insert UGR Calculation Point and UGR Calculation Area
Adjust Viewing Direction of UGR Observer and UGR Area
Exterior Lighting
Exterior Scenes
Ground Elements
Floodlight Illumination
Lighting Design according to prEN12464 Part 2 / EN8995-2
Glare Rating
Obtrusive Light / ULR Calculation
Obtrusive Light / Luminous Intensity Calculation Point
Street Valuation Fields in Exterior Scenes
Road lighting
Standard Streets
Quick Street Planning Wizard
Wizard Optimised Street Light Arrangement
Street Planning without Wizard
Illumination Conditions Wizard
Illumination Class Wizard
Street Illumination
Luminance Calculation according to DIN 5044
Global Output Settings
User Data and Project Data
Global Settings
Output
Viewing Calculation Results
Limit Result Output
Output Settings
New Output in DIALux
Luminaire Data Sheet
Luminance Diagram
Tabular Presentation of Photometric Data of Luminaires
Tabular Presentation of Exterior Scenes
Creating User-Defined Standard Output
Save Output as PDF-File
Export Output Graphics, tables, text and graphic
DWG and DXF Import and Export
DWG / DXF-Import
Basic DWG / DXF Settings and Layer Selection
Edit a Room based on the DWG / DXF-Ground Plan
Working with the DWG / DXF Background in the 3D View
DWG / DXF-Export
Energy Performance of Buildings
Background information
Why energy evaluation in DIALux?
Structure of an energy evaluation project
Energy evaluation rooms with links to DIALux rooms and without
Working on parameters
Calculation and results
Documentation of energy evaluation results
Making videos in DIALux
Raytracer
Background
POV-Ray Settings within DIALux
Photo Realistic Images with Raytracing
Basic Settings
Quick preferences
Image preferences
Indirect calculation
Brightness preferences
Raytracing-Options for Surfaces
3-D Standard View for Raytracing
Starting POV-Ray
Start of the adapted POV-Ray Version
Smoothing edges
Picture ratio
Camera
Animation
Animation with Keyframes
Translation animation
Colour
Further functions of POV-Ray
Appendix A Keyboard Short Cuts