Emergency lighting can be calculated according to the European standard EN1838. In the introduction of the standard EN 1838 on page 2 it is stated that only the direct light has to be taken into account and not the reflected (indirect) component for the calculation of the emergency lighting scene. Also the special regulation of the Lighting Guide 12 (LG12) from the SLL in the UK, that the first reflection of direct light onto a ceiling is selectable for the calculation. In DIALux additional calculation methods are required for escape route lighting and open area lighting.
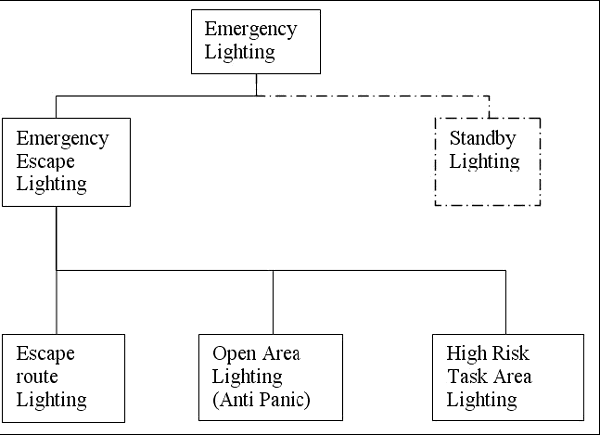
Fig. 209 Types of emergency lighting
Standby lighting is calculated like a regular lighting design. The option to do an emergency escape lighting design is available when a lighting scheme is inserted into a DIALux project and it is set to an emergency lighting scheme. Because the emergency situation and lighting is often integrated into a regular lighting design and realised with luminaires which are in use also for the regular lighting, this reduces the work the designer has to do. You are able to select those luminaires, which are used for emergency lighting from all the luminaires placed in a room and you can also place additional luminaires which are only used in an emergency. Such luminaires, which are only used in the emergency case, are not taken into account in the “regular” lighting calculation. But these luminaires are placed and they are listed for the outputs to locate them for the commissioning. You can select for each luminaire whether it is used in the regular lighting, in the emergency lighting only or for both cases. The duration time and the luminous flux can be set for the emergency case. The dimming of luminaires and taking daylight into account in an emergency lighting scheme is of course not possible.
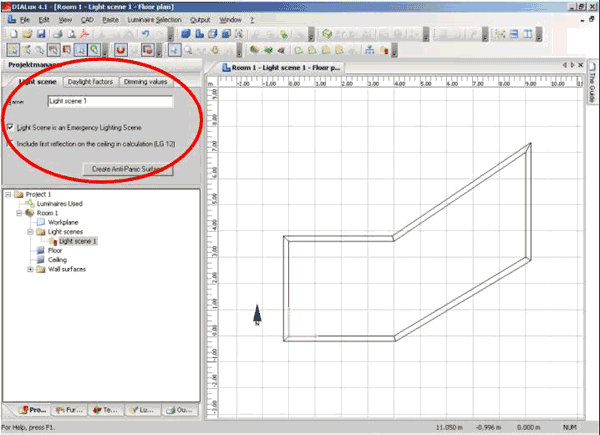
To create an emergency lighting scheme you just have to select the desired room and make a right click to add a lighting scheme.
Fig. 210 Emergency lighting scene
If you want to design an emergency lighting project for the UK market, it will be possible to define here the calculation according to Lighting Guide 12, to take into account the first reflection of direct light on the ceiling(s). This, of course, will be automatically switched on if the user selected the standard settings according the UK market (global options, like UGR SHR and illuminance quotient).
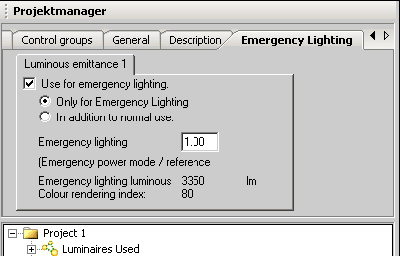
You can define for each light emitting object whether it is used for emergency lighting.
Fig. 211 Property Page of emergency lighting
For each luminaire and each LEO (Light emitting object, a luminaire may have more than one light output) of a luminaire, there will be a luminaire data sheet for emergency lighting available. This datasheet offers important information about the LEO. The first one will be a graphic for the “Disability Glare Zone”. In this graphic the maximum intensity values of EN1838, Table 1 will be listed and in two sketches the maximum intensity values of the LEO for the “flat floor” and for the “uneven floor” will be given. The second graphic / table will show the maximum distances for the mounting of the luminaire to achieve a desired illuminance (for example 1 lx). It will list several mounting heights (2m up to 5m) and the mounting options: wall to transverse, transverse to transverse, transverse to axial, axial to axial and axial to wall.
Fig. 212 Output – Emergency lighting data sheet
New features and increments
Changes in existing functionality
Installation
Installation after Internet Download
Installation from CD
Online Menu
Online Update
Manage Newsletter subscription
Wishes and Feedback / Send problem report
Install Luminaire Data
About PlugIns
About Online Catalogues
Lamp PlugIns
DIALux directories
Background information
Furniture, textures, my database
Projects and raytracing files
Program files, support
Common used program files (DIALux, PlugIns)
DIALux Light
Working with Wizards
The DIALux User Interface
The CAD Window
The Project manager
The Luminaire Selection
The User Database
Insert Luminaire Files into DIALux
Lamp PlugIns
The Furniture Tree
The Colours Tree (since version 4.3, formerly Texture Tree)
The Output Tree
The Guide
The Inspector
Edit Mode
Optimise Personal Settings
General Options
Direct3D as an alternative to OpenGL
Create a New Project
Open a new project
Project information in the file open dialog
Edit Rooms
Edit Room Geometry
Edit Room Data
An easy method for determining maintenance factor
Extended method for determining maintenance factor
Modify Properties of Individual Walls
Insert Room Elements
Modify a Room with Room Elements
Vault and half vault
Insert via Property Page
Insert Furniture
Insert Furniture
Insert via Property Page
Create Furniture
Import Furniture Files
Extrusion Volumes
Subtraction of Objects
Selecting Single Surfaces
Windows and Doors
Decoration Objects
Insert Decoration Objects
Calculate with Decoration Objects
Insert Textures
Insert via Drag & Drop
Edit Placed Textures
Delete Textures
Import Textures into the Texture Tree
Edit Room Geometry with DWG or DXF-File
Duplicate (Copy Rooms/Scenes/Streets)
Duplicate an Existing Room
Insert and Edit Luminaires and Luminaire Arrangements
Online Catalogues
Individual Luminaires
Aligning Luminaires
Inserting Luminaire Fields
Inserting Luminaire Lines
Aligning Lights
Inserting Luminaire Circles
Separating Luminaire Arrangements
Modify the position of a Luminaire
Luminaires with articulated joints
Unrestricted lighting arrangements
Aligning luminaire arrangements
Calculation of luminaire geometry included
Illumination strategies
Insertion of luminaries with „direct planar lighting”
Insertion of luminaries with „vertical planar lighting”
Coloured light
Background information
Lamp spectrum / Light colours
Colour filters
Coaction of spectral distribution of the light source and colour filter
Light colours in the ray tracing
White balance
Light Scenes and Control Groups
Definition
Requirements
Generate a project with light scenes and control groups
Modify light scenes and control groups
Export of light scenes
Emergency lighting
Global
Escape route lighting
Open area lighting (anti panic)
High risk task area lighting
Luminaires with emergency lights
Emergency lighting data sheet
Daylight calculation in DIALux
Basics
Sky types in DIALux
Light Scenes
Daylight calculation
Obstruction
Sun and shadow visualisation
Settings in the calculation dialogue
Working in the 3D View
Setup the 3D View
Check Calculation Values in the 3D View
Save 3D View
Presentation of false colour rendering
Working in Various Views
Save 3D CAD views
Wireframe Model
Editing Inserted Objects
Moving Objects
Using any surface as a working surface
Moving and Rotating Objects without Pick Grid
Scale or rotate
Rotating Objects
Scaling Objects
Combining and Saving Objects
Moving the Coordinate Origin of an Object
Resetting the rotation of the origin
Editing Object Surfaces
Arrangement aids
Measurement of distances
Working with the snap grid
Automatic help lines
Helping areas defined in the ruler
Working with help lines
Simple help lines
Poly help lines
Spline help line
Circular help line
Help grids
Copy and paste with CTRL+C, CTRL+V and CTRL+H
Copy Along a Line
Align and distribute
Centre objects in the room
Calculation Surfaces and other Calculation Objects
Calculation Surfaces
Calculation surfaces for different types of illuminance
Penetration
Task Areas
Calculation Points
UGR Calculation
Insert UGR Calculation Point and UGR Calculation Area
Adjust Viewing Direction of UGR Observer and UGR Area
Exterior Lighting
Exterior Scenes
Ground Elements
Floodlight Illumination
Lighting Design according to prEN12464 Part 2 / EN8995-2
Glare Rating
Obtrusive Light / ULR Calculation
Obtrusive Light / Luminous Intensity Calculation Point
Street Valuation Fields in Exterior Scenes
Road lighting
Standard Streets
Quick Street Planning Wizard
Wizard Optimised Street Light Arrangement
Street Planning without Wizard
Illumination Conditions Wizard
Illumination Class Wizard
Street Illumination
Luminance Calculation according to DIN 5044
Global Output Settings
User Data and Project Data
Global Settings
Output
Viewing Calculation Results
Limit Result Output
Output Settings
New Output in DIALux
Luminaire Data Sheet
Luminance Diagram
Tabular Presentation of Photometric Data of Luminaires
Tabular Presentation of Exterior Scenes
Creating User-Defined Standard Output
Save Output as PDF-File
Export Output Graphics, tables, text and graphic
DWG and DXF Import and Export
DWG / DXF-Import
Basic DWG / DXF Settings and Layer Selection
Edit a Room based on the DWG / DXF-Ground Plan
Working with the DWG / DXF Background in the 3D View
DWG / DXF-Export
Energy Performance of Buildings
Background information
Why energy evaluation in DIALux?
Structure of an energy evaluation project
Energy evaluation rooms with links to DIALux rooms and without
Working on parameters
Calculation and results
Documentation of energy evaluation results
Making videos in DIALux
Raytracer
Background
POV-Ray Settings within DIALux
Photo Realistic Images with Raytracing
Basic Settings
Quick preferences
Image preferences
Indirect calculation
Brightness preferences
Raytracing-Options for Surfaces
3-D Standard View for Raytracing
Starting POV-Ray
Start of the adapted POV-Ray Version
Smoothing edges
Picture ratio
Camera
Animation
Animation with Keyframes
Translation animation
Colour
Further functions of POV-Ray
Appendix A Keyboard Short Cuts